How to Make Olive Bread
Introduction to Olive Bread
Ah, the sheer joy of biting into a slice of freshly baked olive bread! The crunch of the golden crust, the soft, airy interior speckled with briny olives—it’s a little slice of heaven. Making olive bread at home isn’t just about creating something to eat.

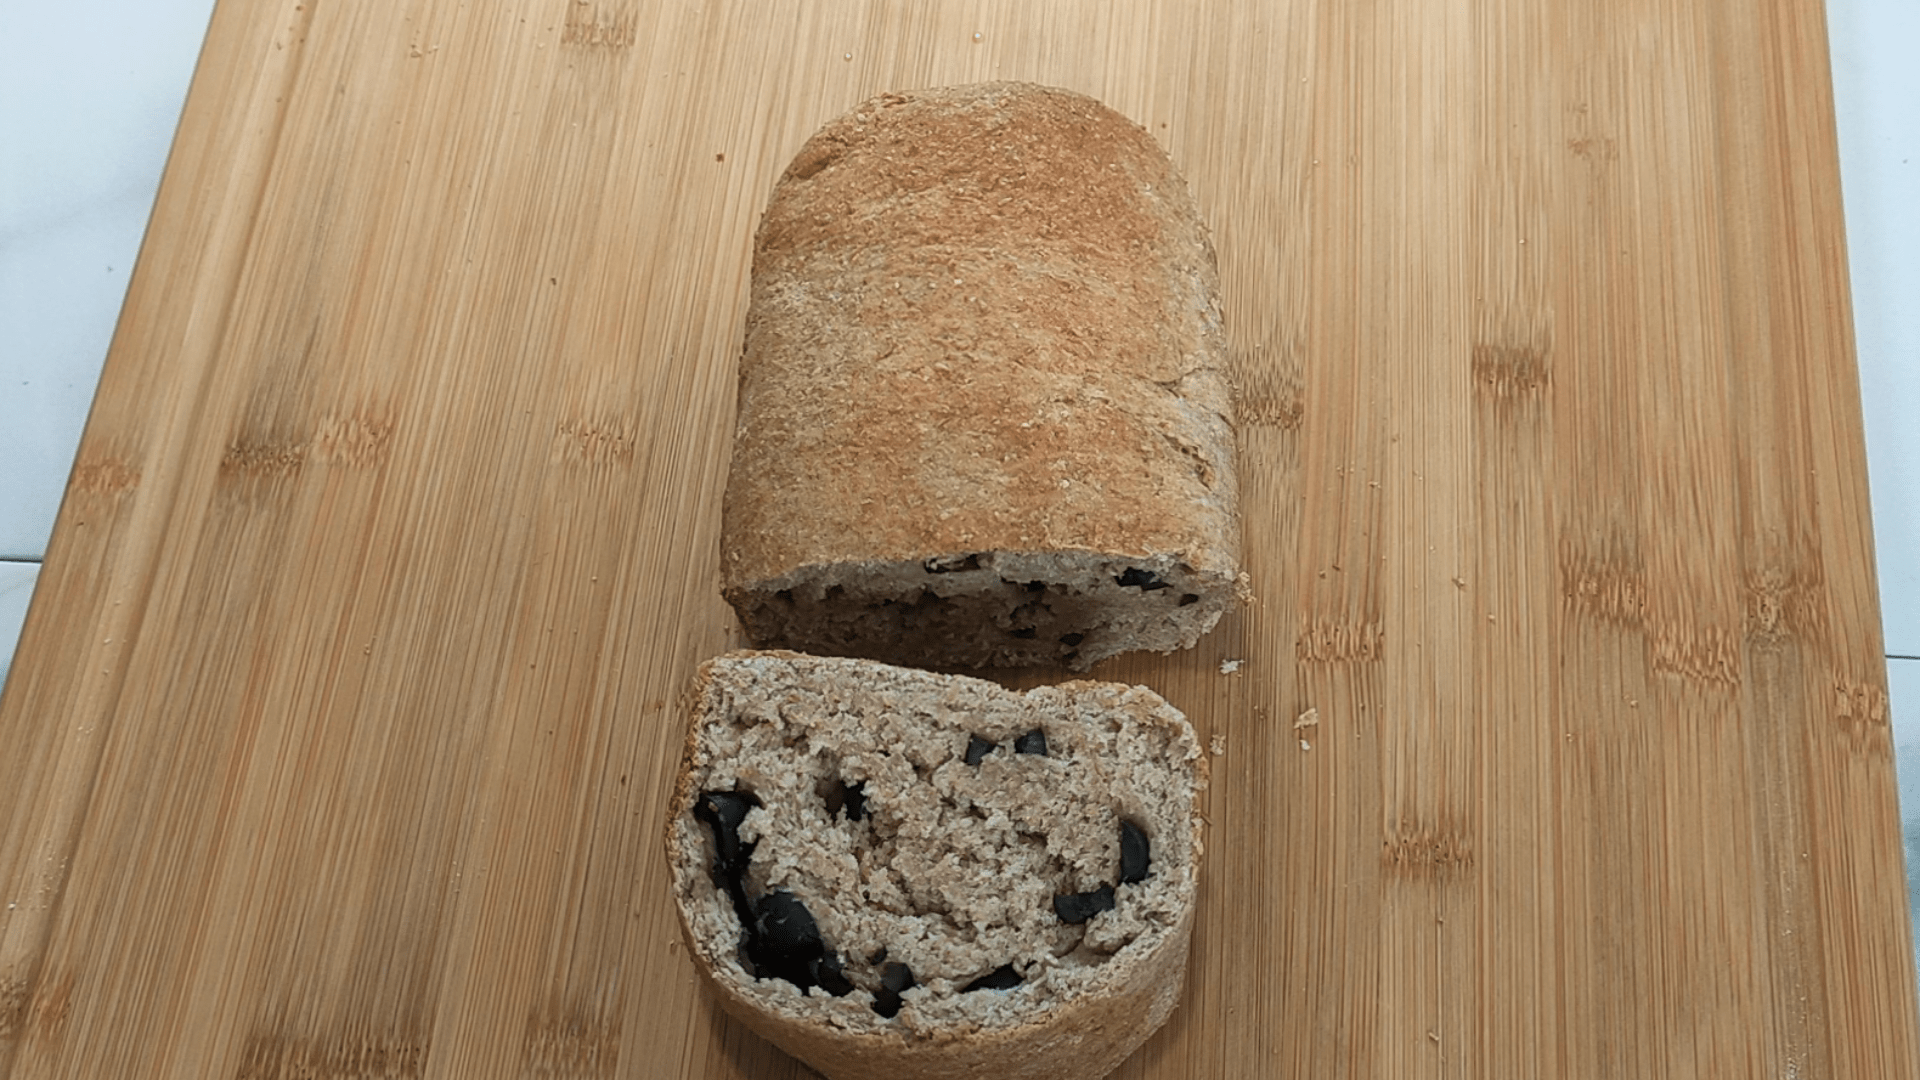
Olive Bread
10
servings30
minutes30
minutes110
kcalIngredients
220ml warm milk
2 tbsp of honey
1 tbsp dry yeast
300g of whole grain flour
Half a teaspoon of salt
2 tbsp olive oil
Black olives
Directions
- Add warm milk Honey and yeast to a bowl mix and let rest for 5 minutes
- Add your flour and salt and bind together
- Add some olive oil, cover and leave to rest
- When size has doubled add a dusting of flour
- Knead the dough and push out any air
- Make a ball shape and roll it out flat
- Add your olives to the flattened dough, then fold and roll the dough.
- Place the dough in a greased bread tin and let rest and expand.
- Pre-heat oven to 190 c, and cook in the middle of the oven for 30 minutes
- Brush a mix of honey and water over the bread for a nice texture.
Recipe Video
it’s about the whole experience of kneading, shaping, and baking a loaf that fills your home with the most tantalizing aromas. Whether you’re a seasoned baker or a beginner, olive bread is a must-try recipe that will elevate your baking game and delight your taste buds. Let’s dive into the delightful process of making this Mediterranean marvel!

The Essential Ingredients
Like any great bread, the foundation of olive bread lies in its ingredients. But not just any ingredients will do—you want the best of the best.
Start with the flour. Bread flour is typically recommended because it has a higher protein content, which is crucial for developing the gluten that gives bread its structure. However, a mix of bread flour and all-purpose flour can also work if you’re looking for a slightly lighter crumb.
Then, we come to the olives—the stars of the show! Not all olives are created equal, and choosing the right variety can make or break your bread. Kalamata olives are a popular choice for their robust flavor, but green olives, like Castelvetrano, offer a milder, buttery taste that’s equally delicious. Don’t forget the olive oil—opt for extra virgin olive oil for its superior flavor and health benefits. It adds richness to the dough and enhances the overall taste of the bread.

Preparing the Dough
Now that we’ve gathered our ingredients, it’s time to bring them together. Start by mixing your flour, yeast, and water. You want to aim for a dough that is slightly sticky but not overly wet. Hydration is key in bread making, and finding that balance can make a big difference in the final texture.
Kneading is where the magic begins. As you work the dough, you’re developing the gluten, which gives the bread its chewy texture. Don’t rush this step—knead with patience, using the heel of your hand to push the dough away and then fold it back. You’ll know the dough is ready when it becomes smooth and elastic.
Once kneaded, it’s time to let the dough rise. Place it in a lightly oiled bowl, cover it with a damp cloth, and let it sit in a warm, draft-free spot. This is where your patience pays off. As the dough rises, the yeast works its magic, creating bubbles of gas that give the bread its airy texture. Depending on the temperature of your kitchen, this could take anywhere from one to two hours.

Incorporating Olives
After the dough has risen, it’s time to introduce the olives. But when should you add them? The best time is after the first rise, during what’s known as the “knockback” stage, where you gently punch down the dough to release the gas.
Fold in the olives gradually, making sure they’re evenly distributed throughout the dough. This ensures every bite has that delightful burst of olive flavor. If you want to elevate the taste even further, now’s the time to add in any additional ingredients like rosemary, thyme, or even a touch of crushed red pepper for some heat.

Shaping and Proofing the Dough
With the olives well-incorporated, it’s time to shape the dough. Whether you’re making a traditional loaf or rustic rolls, the key is to handle the dough gently to preserve all those lovely air pockets.
If you’re going for a loaf, shape the dough into a tight, even log. For rolls, divide the dough into equal portions and roll each piece into a ball. Scoring is an optional but recommended step—using a sharp knife, make shallow cuts on the surface of the dough. This not only adds a decorative touch but also helps control the way the bread expands during baking.
Before popping your dough into the oven, it needs a final proof. This second rise allows the dough to relax and expand even more, leading to a lighter, airier crumb. This should take about 30 to 60 minutes.

Baking Olive Bread
Preheat your oven to a high temperature—around 450°F (230°C) is ideal. Baking bread requires an initial blast of heat to set the crust and create that coveted golden-brown exterior.
If you want an extra-crispy crust, consider baking your bread with steam. You can do this by placing a pan of water at the bottom of the oven or by spraying water into the oven just before closing the door. Bake the bread for 25-35 minutes, depending on the size of your loaf or rolls, until the crust is deep golden and the bread sounds hollow when tapped on the bottom.

Cooling and Storing Olive Bread
Once your olive bread is baked to perfection, resist the temptation to slice into it right away. Cooling the bread is essential—it allows the interior to finish cooking and the flavors to fully develop. Place the loaf on a wire rack and let it cool completely.
To store olive bread, wrap it in a clean kitchen towel or place it in a paper bag. This helps maintain the crust’s crispness while keeping the interior soft. If you need to store it longer, consider freezing the bread. Just be sure to wrap it tightly in plastic wrap and then in foil.
When it’s time to enjoy your bread again, reheat it in a 350°F (175°C) oven for about 10 minutes to revive its crust and warmth.
Serving Suggestions and Pairings
Olive bread is incredibly versatile, making it a perfect companion for a variety of dishes. Pair it with a selection of cheeses for a simple yet sophisticated snack. Its savory, slightly tangy flavor also complements hearty soups and stews beautifully.
For a more creative use, consider turning olive bread into crostini or bruschetta—top slices with fresh tomatoes, basil, and a drizzle of balsamic glaze. And if you’re feeling indulgent, a spread of whipped feta or tapenade will take your olive bread experience to the next level.
There’s something undeniably satisfying about making olive bread at home. It’s not just about the end result—though that is undoubtedly delicious—but about the entire process. From mixing the dough to watching it rise, to the moment you pull that golden loaf out of the oven, it’s a journey worth every step. So, roll up your sleeves, grab those olives, and start baking!